The CSV import allows you to import existing data into the app (for example from another app or your bank). In this article, you will learn how the CSV import works and how you can fix typical errors.
Import a CSV file
- To import a CSV file, open the app and navigate to “Settings” => “Data” => “Synchronization and Data” in the settings. There you will find the “CSV Data” section at the bottom where you will find both the import and the export.
- After you have clicked on “Import”, a view will open in which you can select the existing CSV file on your device.
- In the view that then opens, the columns of the CSV file must now be mapped to the corresponding fields (e.g. which column contains the amount values or the names of the associated category). In many cases, the column names can be recognized automatically by the app. However, if this is not the case, the corresponding field must be mapped manually. To map a field, click on the corresponding entry and then select the name of the field.
Here is a list of all fields, including required ones and default values:
| Field | Description | |
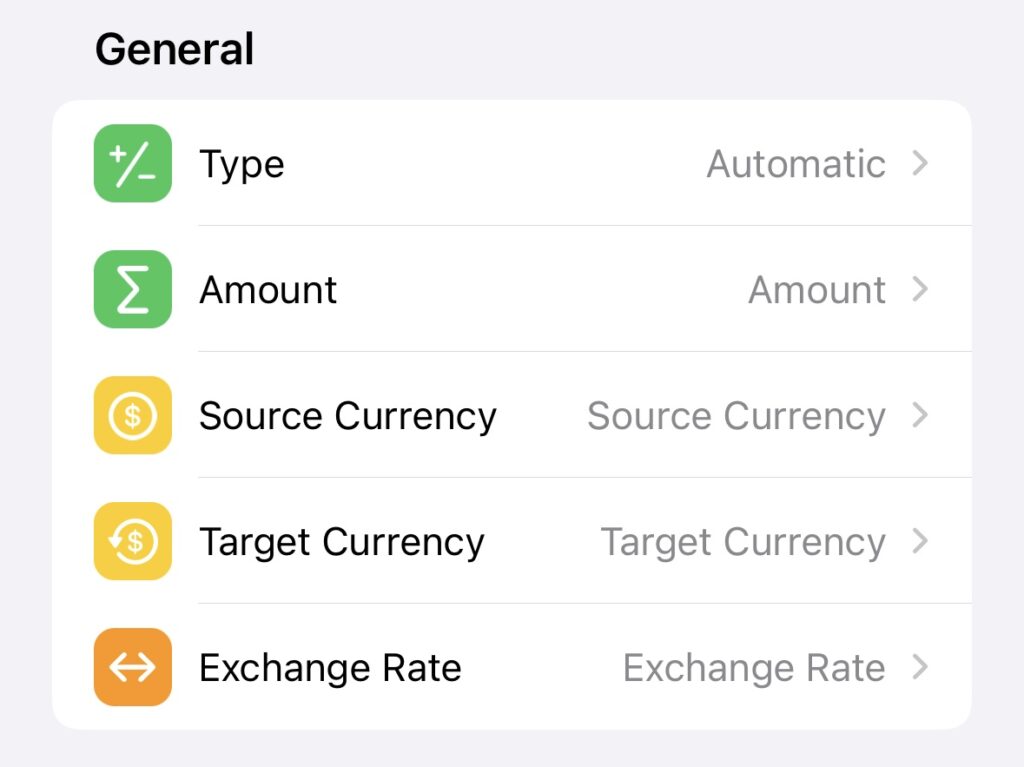
| General | ||
| Type [v1.6.1+] | The optional type field. If not set, the type is determined based on the sign of the amount (e.g. “10.00” is considered as income and “-10.00” as expense). However, since there are also CSV files that show the type as a separate column and export the amounts without a sign, the type can also be set manually for all transactions to be imported. | |
| Amount [Required] | The amount field. | |
| Source Currency | The optional source currency field. If not set, the currency of the selected default account will be used. | |
| Target Currency | The optional target currency field (for foreign currencies). If not set, the currency of the selected default account will be used. | |
| Exchange Rate | The optional exchange rate field (for foreign currencies). If not set, the exchange rate will be set to 1. | |
| ⠀ | ||
| Assignment | ||
| Budget Book | The optional budget book field. If not set, the currently selected budget book will be used. | |
| Source Account | The optional (source) account field. If not set, the default account will be used. | |
| Target Account [v2.2.1+] | The optional (target) account field (for transfers). If a target account is specified in the CSV file: • Budget Flow will attempt to link related transactions during the import process. • For the transactions to be linked as a transfer, all properties must match, except: ⠀• Account: The “Target Account” must be specified as “Source Account” the second transaction. ⠀• Amount: The amount must be inverted. For example, “-1000” in the original transaction should match with “1000” in the linked transaction. ⠀• Starting with version 3.1.16, the exchange rate is also taken into account when identifying transfers. ⠀• Example: Transaction A (Amount = -500 | Source Currency = THB | Target Currency = EUR | Exchange Rate = 50) and Transaction B (Amount = 10 | Source Currency = EUR | Target Currency = THB | Exchange Rate = 0.02) are considered identical for the purpose of identifying transfers. • If the transactions do not match as described above, they will not be linked in the app and will not be recognized as a transfer. • In any case, if a “Target Account” is specified, the “Evaluated” flag of the transaction will be automatically set to “False”, ensuring that the transaction does not falsify statistics (e.g., so a transfer is not counted as income or an expense). | |
| Folder | The optional folder field. If a folder is specified in the CSV file: • If the corresponding folder already exists in the app, the transaction will be assigned to it. • If the folder does not exist, a new one will be created during the CSV import and the transaction will be assigned to it. If a category is specified in the CSV file, but no folder is specified, a new folder called “Other” is created and the category and transaction are assigned to this folder. | |
| Category | The optional category field. If a category is specified in the CSV file: • If the corresponding category already exists in the app, the transaction will be assigned to it. • If the category does not exist, a new category will be created during the CSV import and the transaction will be assigned to it. • If no folder is specified in the CSV file, the new category is placed in a newly created folder named “Other” and the transaction is assigned to it. If no category is specified in the CSV file, the transaction is displayed as “Unassigned”. | |
| Payee | The optional payee field. | |
| Tags [v1.6.4+] | The optional tags field. | |
| ⠀ | ||
| Due | ||
| Date [Required] | The date field (e.g. “12/08/1995”) | |
| Date Format [Required] | The date format (e.g. “dd/MM/yyyy”). This field cannot be automatically recognized because, as in “12/08/1995”, the 12 could be both the month “MM” and the day “dd”. However, to make the setting easier for you, the first value from the CSV file to be imported is shown at the top as an example: 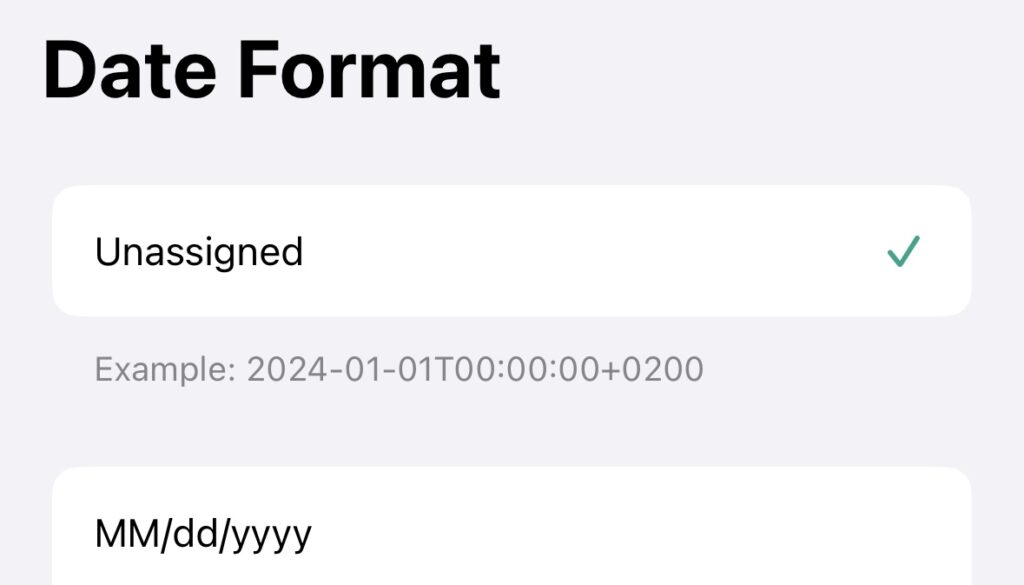 | |
| ⠀ | ||
| Payment | ||
| Pending [v2.2.1+] | The optional is pending field. This is useful if, for example, you want to import transactions that have not yet been debited (e.g. for credit card payments). | |
| ⠀ | ||
| Miscellaneous | ||
| Notes | The optional notes field. | |
| Skip “0” Amounts [v2.2.1+] | Indicates whether transactions where the amount is “0” should be skipped. This is useful when importing files that contain separate columns for income and expense amounts, where the contra column contains only a value of “0”. In such cases, only the relevant transactions will be imported, excluding those with zero amounts. Similarly, it is also very useful for files that contain transactions with an amount of “0”, ensuring that these zero value transactions are not imported into the app. | |
| Skip Duplicates [v1.4.3+] | Indicates whether duplicate transactions should be skipped. This is useful if you are re-importing a file that was previously imported incorrectly. However, this setting is disabled by default because it slows down the import of large files as there are many transactions to verify. |
- If all fields have been mapped correctly and the validation was successful, you can click the “Import” button in the top right corner and perform the import. You will then see a dialog showing the progress and the number of successfully imported transactions.
Troubleshooting
- Because the CSV format is not very well specified, it is unfortunately not possible to rule out the possibility of errors occurring during the import process. For example, many CSV formats can be imported without problems (e.g. “10”, “10.00”, or “10,00” as an amount), but if the file contains something uncommon like “ten euros”, it won’t work.
- The first step is to compare it to the template available for download in the app. Once you have modified your CSV file, you can try to import it again.
- If the CSV import still doesn’t work, feel free to contact the support within the app (“Settings” => “Support” => “Contact Developer” => “Other (Mail)”). Please make sure to attach a sample CSV file (e.g. with fictitious values) that can be used to reproduce and investigate the bug further.